

Androidでリストを表示するリストビュー(ListView)の行のレイアウトをカスタマイズする方法を紹介します。1行に多くの情報を表示させることができるので、画面領域を有効に活用できます。
ListViewの基本
ListViewの行をカスタマイズする前に、基本的な活用方法を確認したい方は以下記事を参照ください。

本記事はこの記事の応用の位置づけになります。
ListViewの行をカスタマイズする準備
Listview内の行要素用のレイアウトファイルが必要です。
res>layoutフォルダ内に行のレイアウトを記すxmlファイルを作成します。
(layoutフォルダ上で右クリック > New > 「Layout Resource File」を選択して作成)
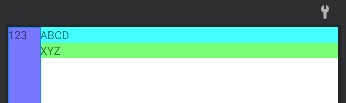
今回は、listview_row.xmlという名前で作成しました。
中身は以下の通り(3つのTextViewを行要素としています)。
<?xml version="1.0" encoding="utf-8"?>
<LinearLayout xmlns:android="http://schemas.android.com/apk/res/android"
    android:layout_width="match_parent"
    android:layout_height="match_parent">
    <TextView
        android:id="@+id/row_tvTitle"
        android:layout_width="40dp"
        android:layout_height="match_parent"
        android:background="#77f"
        android:text="123"/>
    <LinearLayout
        android:layout_width="match_parent"
        android:layout_height="match_parent"
        android:orientation="vertical">
        <TextView
            android:id="@+id/row_tvText1"
            android:layout_width="match_parent"
            android:layout_height="wrap_content"
            android:background="#4ff"
            android:text="ABCD"/>
        <TextView
            android:id="@+id/row_tvText2"
            android:layout_width="match_parent"
            android:layout_height="wrap_content"
            android:background="#7f7"
            android:text="XYZ"/>
    </LinearLayout>
</LinearLayout>
行要素の構成は各々でカスタマイズしてみてください。上記はただの一例。
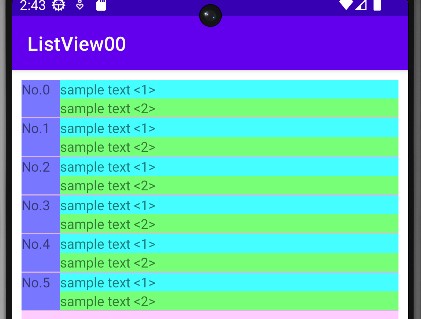
行をカスタマイズしたListViewのサンプル
サンプルとして、以下のようなカスタマイズをしたリストビューを作成しました。
XML
XMLは以下の通り(特に工夫なし)。
<?xml version="1.0" encoding="utf-8"?>
<LinearLayout xmlns:android="http://schemas.android.com/apk/res/android"
    xmlns:app="http://schemas.android.com/apk/res-auto"
    xmlns:tools="http://schemas.android.com/tools"
    android:layout_width="match_parent"
    android:layout_height="match_parent"
    android:orientation="vertical"
    tools:context=".MainActivity">

    <!-- カスタムするリストビュー -->
    <ListView
        android:id="@+id/lvCustom"
        android:layout_width="match_parent"
        android:layout_height="400dp"
        android:layout_margin="10dp"
        android:background="#fcf"/>

</LinearLayout>
Kotlin
Kotlinは以下の通り。
from(データを入れる器)と、to(データを入れる先のレイアウト要素)を作成し、それらをアダプターでひとまとめにして、それをListViewにバインドする感じです。
class MainActivity : AppCompatActivity() {

    private lateinit var binding : ActivityMainBinding

    override fun onCreate(savedInstanceState: Bundle?) {
        super.onCreate(savedInstanceState)

        binding = ActivityMainBinding.inflate(layoutInflater)
        val view = binding.root
        setContentView(view)

        // リストビューに表示するリストデータ
        val cstmList:MutableList<MutableMap<String, Any>> = mutableListOf()

        // SimpleAdapterの第4,5引数(from:データ、to:データを入れる先)を用意
        val from = arrayOf("title", "text1", "text2")
        val to = intArrayOf(R.id.row_tvTitle, R.id.row_tvText1, R.id.row_tvText2)

        // 各行要素のデータを作成(for文で5行分の要素を作成)
        for(i in 0 .. 5){
            var ele = mutableMapOf<String, Any>("title" to "No."+i.toString() ,"text1" to "sample text <1>", "text2" to "sample text <2>")
            cstmList.add(ele)
        }

        // アダプタオブジェクトの生成 (layoutファイル、from、to を紐づける)
        val cstmadapter = SimpleAdapter(this@MainActivity, cstmList, R.layout.listview_row, from, to)

        // リストビューにアダプタオブジェクトを設定
        binding.lvCustom.adapter = cstmadapter
    }
}
さいごに
今回は、Listviewの行要素をカスタマイズする方法を紹介しました。1行に色々表示されているリストはかっこよくて好きなので、使っていきたいですね。
以下Android関連記事。


コメント