
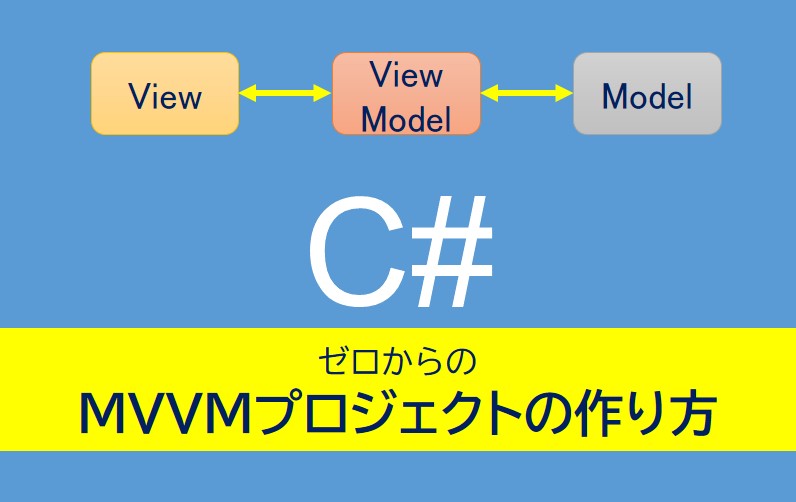
MVVM構成のプロジェクトの作り方を、フォルダ構成から順番に説明します。お急ぎの方は先にサンプルプログラムをコピペして、実行後、エラー解決に記事を読み返す手順でもいいと思います。
MVVMサンプル作成の全体の流れ
以下の順序で通常の「新規作成プロジェクト」を「MVVMプロジェクト」に変更します。
- VisualStudioで「WPFアプリの新規プロジェクト」を作成
- 作成されたプロジェクトの「ソリューションエクスプローラー」にて必要なフォルダ(View用、ViewModel用、Model用、その他用)を作成
- 各フォルダ内にソースファイルを移動、または作成
- 変数通知機能、コマンド機能の実装
では以下に順に説明します。
MVVMの作り方・フォルダ構成
プロジェクト作成とフォルダの準備
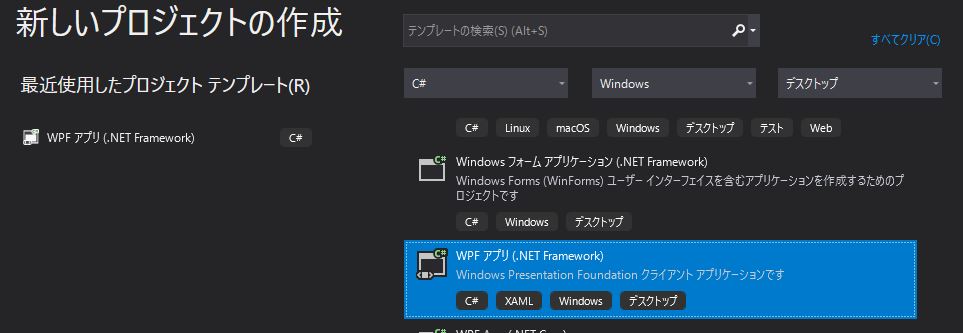
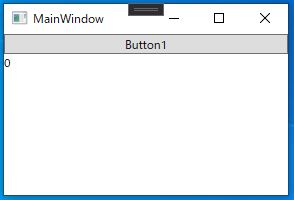
VisualStudioを起動し、「WPFアプリ」を新規作成します。
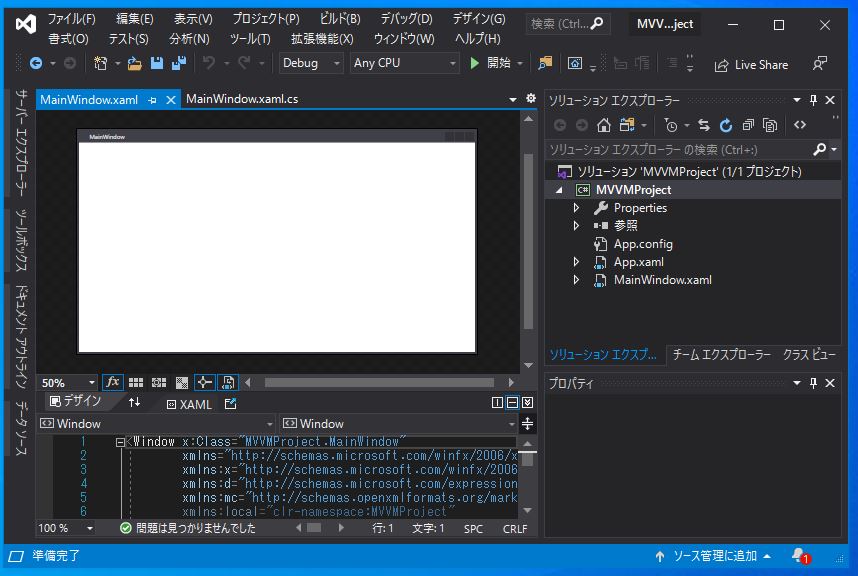
プロジェクトが生成されると、プロジェクトが起動され、以下画面が表示されると思います(画面の様子はVisualStudioの設定によって若干違いはあります)。
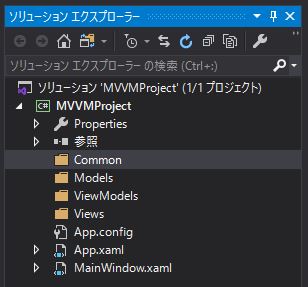
次に「ソリューションエクスプローラー」上にて右クリックして以下フォルダを作成します。
- Views・・・画面表示に関するファイルを入れる用
- ViewModels・・・画面と処理を繋ぐViewModel関連ファイルを入れる用
- Models・・・処理に関するファイルを入れる用
- Common・・・その他必要なファイルを入れる用
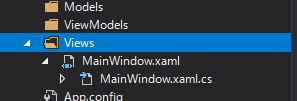
この時点でフォルダ構成は以下画像のようになります。
View要素をフォルダ内に移動
ソリューションエクスプローラ上にて画面表示に関係する以下2つのファイルをViewsフォルダにドラッグで移動させます。
- MainWindow.xaml
- MainWindow.xaml.cs
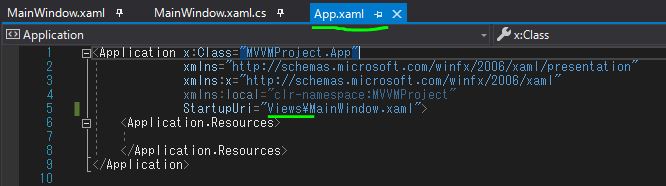
移動後、デバッグをするとエラーになるはずです。原因はファイルを移動させたからです。
以下でその対処(pathの整合をとる)を行います。
まずは、MainWindow.xamlとApp.xamlを以下画像のように「.Views」を追記します。

次にMainWindow.xaml.csで、namespaceに「.Views」を追記します。
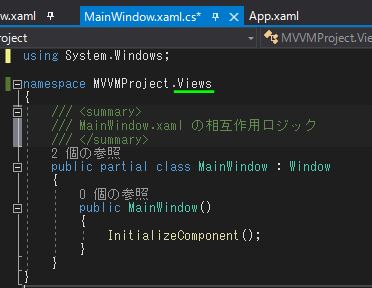
これで正しくファイルが読み込まれるようになったので、デバッグしてもエラーにならないはずです。
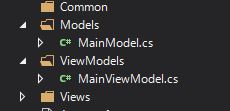
ViewModelとModelの中身を作成
作成したViewModelsフォルダとModelsフォルダにて新規作成から、ファイルを作成します。
ファルダを右クリックから、追加>>新しい項目>>「クラス」選択>>追加、で追加します。
今回は、MainViewModel.cs と MainModel.cs をそれぞれのフォルダに作成しました。
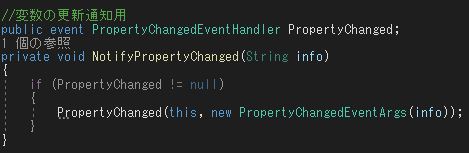
通知機能(NotifyPropertyChange)の実装
MVVMでは表示している値が変更された場合に、その変更内容をView(表示)側に通知する必要があります。
その通知をできるようにするために、MainViewModelクラスに以下2要素を追記します。
- クラスにインターフェース「INotifyPropertyChanged」を実装させる
- 以下のプログラムをクラス内に追記
コマンド機能の実装
MVVMではボタン操作はCommandでバインドします。
そのためには、ICommandインターフェースを実装したクラスを使用します。
フォルダを右クリックし、追加>>新しい項目>>「クラス」選択>>追加、でファイルを追加します。
今回はファイル名を、RelayCommand.csにしました。

RelayCommand.csの内容はサンプルプログラムをコピペしてください。
コマンド機能を実装するためのプログラムなので今後編集することもないです。
MVVMのサンプルプログラム
今まで説明したことを踏まえたMVVMプロジェクトのサンプルプログラムを本章にて掲載します。
プロジェクト名(サンプルではMVVMProject)などは各自のものに修正してください。
作成したサンプルは、ボタンを押すと数値(count)が増えるソフトです。もちろん数値の更新は画面に反映されます。
Modelは必須要素がないので、今回は省略しています。
View
xamlは以下の通り。
<Window x:Class="MVVMProject.Views.MainWindow"
        xmlns="http://schemas.microsoft.com/winfx/2006/xaml/presentation"
        xmlns:x="http://schemas.microsoft.com/winfx/2006/xaml"
        xmlns:d="http://schemas.microsoft.com/expression/blend/2008"
        xmlns:mc="http://schemas.openxmlformats.org/markup-compatibility/2006"
        mc:Ignorable="d"
        Title="MainWindow" Height="200" Width="300">
    <Grid>
        <StackPanel Orientation="Vertical" >
            <Button Content="Button1" Command="{Binding Button1_Pushed}" />
            <TextBlock Text="{Binding count}" />
        </StackPanel>
    </Grid>
</Window>
コードビハインドは以下の通り。ViewModelを使うために1行目を記載しています。
using MVVMProject.ViewModels;
using System.Windows;

namespace MVVMProject.Views
{
    /// <summary>
    /// MainWindow.xaml の相互作用ロジック
    /// </summary>
    public partial class MainWindow : Window
    {
        MainViewModel vm = new MainViewModel();

        public MainWindow()
        {
            InitializeComponent();

            this.DataContext = vm;
        }
    }
}

ViewModel
コマンドを使うために1行目を記載しています。
using MVVMProject.Common;
using System;
using System.ComponentModel;
using System.Windows.Input;

namespace MVVMProject.ViewModels
{
    class MainViewModel:INotifyPropertyChanged
    {
        //コマンド
        public ICommand Button1_Pushed { get; set; }

        public MainViewModel()
        {
            //コマンド
            Button1_Pushed = new RelayCommand(Button1_Command);
        }

        //コマンドの処理内容
        private void Button1_Command()
        {
            //カウント数を増やす
            count++;
        }

        //変数(カウント数)
        private int _count;
        public int count
        {
            get { return _count; }
            set
            {
                _count = value;
                NotifyPropertyChanged("count");
            }
        }

        //変数の更新通知用
        public event PropertyChangedEventHandler PropertyChanged;
        private void NotifyPropertyChanged(String info)
        {
            if (PropertyChanged != null)
            {
                PropertyChanged(this, new PropertyChangedEventArgs(info));
            }
        }
    }
}
Common(Command)
コマンドを実装するためのソースは以下の通り。
参考:https://sourcechord.hatenablog.com/entry/2014/01/13/200039
using System;
using System.Windows.Input;

namespace MVVMProject.Common
{
    class RelayCommand : ICommand
    {
        private readonly Action _execute;
        private readonly Func<bool> _canExecute;

        /// <summary>
        /// RaiseCanExecuteChanged が呼び出されたときに生成されます。
        /// </summary>
        public event EventHandler CanExecuteChanged;

        /// <summary>
        /// 常に実行可能な新しいコマンドを作成します。
        /// </summary>
        /// <param name="execute">実行ロジック。</param>
        public RelayCommand(Action execute)
            : this(execute, null)
        {
        }

        /// <summary>
        /// 新しいコマンドを作成します。
        /// </summary>
        /// <param name="execute">実行ロジック。</param>
        /// <param name="canExecute">実行ステータス ロジック。</param>
        public RelayCommand(Action execute, Func<bool> canExecute)
        {
            if (execute == null)
                throw new ArgumentNullException("execute");
            _execute = execute;
            _canExecute = canExecute;
        }


        /// <summary>
        /// 現在の状態でこの <see cref="RelayCommand"/> が実行できるかどうかを判定します。
        /// </summary>
        /// <param name="parameter">
        /// コマンドによって使用されるデータ。コマンドが、データの引き渡しを必要としない場合、このオブジェクトを null に設定できます。
        /// </param>
        /// <returns>このコマンドが実行可能な場合は true、それ以外の場合は false。</returns>
        public bool CanExecute(object parameter)
        {
            return _canExecute == null ? true : _canExecute();
        }

        /// <summary>
        /// 現在のコマンド ターゲットに対して <see cref="RelayCommand"/> を実行します。
        /// </summary>
        /// <param name="parameter">
        /// コマンドによって使用されるデータ。コマンドが、データの引き渡しを必要としない場合、このオブジェクトを null に設定できます。
        /// </param>
        public void Execute(object parameter)
        {
            _execute();
        }

        public void RaiseCanExcuteChanged()
        {
            var handler = CanExecuteChanged;
            if (handler != null)
            {
                handler(this, EventArgs.Empty);
            }
        }
    }
}
さいごに
プロジェクトを新規作成するたびにMVVM化するのは面倒なので、今回のサンプルのような最小単位のMVVMプロジェクトを用意しておき、新たにプロジェクトを作るたびにそのプロジェクトごとコピーするのがオススメです。
以下はMVVMプロジェクトを作れたら、次に使うであろうで基本となる要素を扱った記事です。
C#の学習を始める方にオススメの書籍です。

コメント