

WPFのMVVM形式でデータグリッド(DataGrid)を活用する簡単な方法をサンプルコード付きで紹介します。データグリッドは多くの情報を密に表示できるので一覧表やデータを表示する際に便利です。バインドの方法が分かれば簡単に使えるのでお勧めのGUIオブジェクトです。
DataGridをMVVMで使用するために
View(XAML)側のDataGridとViewModel側のCollectionをデータバインド(Binding)します。
MVVM形式のプロジェクトの作り方を知りたい方は以下の記事を参考にしてください。

サンプルコード(WPF,MVVM)
以下のような見た目のサンプルを作成しました。
DataGrid以外に上側に動作確認用のボタンがあります。
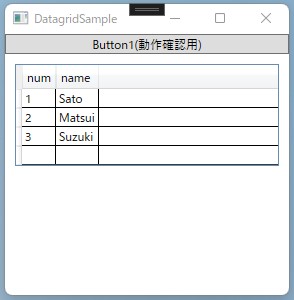
ボタンを押すとDataGrid内の要素が出力されます。DataGridの中身を編集すると出力が変わることも確認できます。
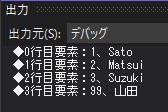
下画像では手動入力で3行目を追加してから、ボタンを押した後の出力の様子。ちゃんと手動編集も反映されて出力されています。
View
XAMLは以下の通り。
<Window x:Class="DatagridSample.Views.MainWindow"
        xmlns="http://schemas.microsoft.com/winfx/2006/xaml/presentation"
        xmlns:x="http://schemas.microsoft.com/winfx/2006/xaml"
        xmlns:d="http://schemas.microsoft.com/expression/blend/2008"
        xmlns:mc="http://schemas.openxmlformats.org/markup-compatibility/2006"
        mc:Ignorable="d"
        Title="DatagridSample" Height="300" Width="300">
    <Grid>
        <StackPanel Orientation="Vertical" >
            <Button Content="Button1(動作確認用)" Command="{Binding Button1_Pushed}" />
            <!--データグリッド-->
            <DataGrid Margin="10" ItemsSource="{Binding ElementsCollection}"/>
        </StackPanel>
    </Grid>
</Window>
コードビハインドは以下の通り(いつものやつ)。
using DatagridSample.ViewModels;
using System.Windows;

namespace DatagridSample.Views
{
    public partial class MainWindow : Window
    {

        MainViewModel vm = new MainViewModel();

        public MainWindow()
        {
            InitializeComponent();
            this.DataContext = vm;
        }
    }
}
ViewModel
コンストラクタにて、コレクションを定義、要素を代入しています。
本サンプルでは、「1行分要素を作成、コレクションに追加する」処理を3回繰り返えしています。
コマンド(ボタンを押すと実行される)にてコレクション内の要素を出力する機能を実装しています(ただの確認用)。
using DatagridSample.Common;
using System;
using System.Collections.Generic;
using System.Collections.ObjectModel;
using System.ComponentModel;
using System.Windows.Input;

namespace DatagridSample.ViewModels
{
    internal class MainViewModel : INotifyPropertyChanged
    {
        //DataGridとバインドするコレクション
        public Collection<Elements> ElementsCollection { get; set; }

        //コマンド
        public ICommand Button1_Pushed { get; set; }

        public MainViewModel()
        {
            //コマンド(動作確認用)
            Button1_Pushed = new RelayCommand(Button1_Command);

            //名前リスト
            string[] names = new string[3] { "Sato", "Matsui", "Suzuki" };

            //表示用のコレクション作成
            ElementsCollection = new Collection<Elements>();

            //ループで要素作成
            for (int i=0; i < 3; i++)
            {
                //DataGrid上1行分の要素作成
                Elements one = new Elements()
                {
                    num = i + 1,
                    name = names[i]
                };
                //コレクションに要素を追加
                ElementsCollection.Add(one);
            }
        }

        //コマンド(動作確認用)
        private void Button1_Command()
        {
            //コレクション要素出力用
            for(int i = 0; i < ElementsCollection.Count; i++)
            {
                Console.WriteLine("◆{0}行目要素:{1}、{2}",
                    i, ElementsCollection[i].num, ElementsCollection[i].name);
            }
        }

        //変数の更新通知用
        public event PropertyChangedEventHandler PropertyChanged;
        private void NotifyPropertyChanged(String info)
        {
            if (PropertyChanged != null)
            {
                PropertyChanged(this, new PropertyChangedEventArgs(info));
            }
        }
    }

    //コレクション内の要素
    class Elements
    {
        public int num { get; set; }
        public string name { get; set; }
    }
}
コレクション内要素Elementsには、set/getアクセサリがないとGUIのDataGrid上に表示されません。必要に応じて使い分けましょう。
サンプルコードの内容的にModelに該当する部分がないの省略しています。
画面の広さには限りがあるのでDataGridは積極的に活用していきたいですね。
本記事の応用版は以下記事です↓
コンボボックスやチェックボックスを含むDataGridの使い方を紹介しています。

他にもGUI関連の記事をたくさん書いているので一覧を見てみてください。
以下はコンボボックスの使い方をまとめた記事です。


コメント