
C#(WPF)でProgressBar(プログレスバー)を初めて使ってみようと思っている方向けの記事です。アプリが重い処理を実行している際に、フリーズしてるか不安になるような場合に使えます。
ソフトの機能的な部分がある程度できるとProgressBarなどを用いてユーザビリティを向上させたくなりますね。
ProgressBarの役割
ソフトに何かしらの重い処理をさせる際に、画面上での変化がないとユーザは「フリーズしたのかな?」のか不安になります。またただ画面上で変化を表示していてもユーザにとっては処理全体のどれくらいの割合進んでいるかも気になるものです。
このような場合に役に立つのが、プログレスバー(ProgressBar)になります。
ProgressBarの使い方
必要な引数は以下の通り。
- 最小値:Minimum
- 最大値:Maximum
- 進捗状態を表す値:Value
MinimumとMaximumの間で、Valueを変化させればそれに応じたBar(帯)が表示されます。
MVVMでのProgressBarの簡単なサンプル
MVVMでのサンプルになります。MVVM形式のプロジェクトの作り方は以下記事を参考にしてください。
違う形式の方でも参考になると思います。また今回の記事本質にかかわらない部分(主にModel)は省略しています。
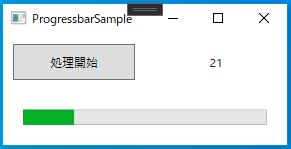
以下サンプルプログラムでは、ボタンを押すと重い処理が実行(非同期)され、その進捗に応じたプログレスバーが表示される、といったものになっています(以下画像参照)。
View
XAMLは以下の通り。
ProgressBarにバインドしたprogressRateに進捗率を代入して表示を更新します。
<Window x:Class="ProgressbarSample.Views.MainView"
        xmlns="http://schemas.microsoft.com/winfx/2006/xaml/presentation"
        xmlns:x="http://schemas.microsoft.com/winfx/2006/xaml"
        Title="ProgressbarSample" Height="150" Width="300">
    <Grid>
        <Grid.RowDefinitions>
            <RowDefinition Height="*" />
            <RowDefinition Height="*" />
        </Grid.RowDefinitions>
        <Grid.ColumnDefinitions>
            <ColumnDefinition Width="*" />
            <ColumnDefinition Width="*" />
        </Grid.ColumnDefinitions>

        <Button Grid.Row="0" Grid.Column="0" Margin="10" Content="処理開始"
                Command="{Binding ProgressStartBtn_Pushed}" />
        <TextBlock Grid.Row="0" Grid.Column="1" HorizontalAlignment="Center" VerticalAlignment="Center"
                   Text="{Binding txt1}" />

        <ProgressBar Grid.Row="1" Grid.Column="0" Grid.ColumnSpan="2" Margin="20"
                     Minimum="0" Maximum="100"
                     Value="{Binding progressRate}" />
    </Grid>
</Window>
コードビハインドは以下の通り。
namespace ProgressbarSample.Views
{
    /// <summary>
    /// MainView.xaml の相互作用ロジック
    /// </summary>
    public partial class MainView : Window
    {
        public MainView()
        {
            InitializeComponent();

            MainViewModel vm = new MainViewModel();
            this.DataContext = vm;
        }
    }
}
ViewModel
namespace ProgressbarSample.ViewModels
{
public class MainViewModel:INotifyPropertyChanged
{
//コマンド
public ICommand ProgressStartBtn_Pushed { get; set; }
public MainViewModel()
{
txt1 = "";
progressRate = 0;
//コマンド
ProgressStartBtn_Pushed = new RelayCommand(ProgressStart_Cmd);
}
//重い処理
private async void HeavyProgress()
{
//非同期で処理を実行
await Task.Run(() =>
{
//0-100までカウント
for (int i = 0; i <= 100; i++)
{
//重い処理想定の待機時間
Thread.Sleep(100);
//別スレッドからのUI更新
Application.Current.Dispatcher.Invoke((Action)(() =>
{
progressRate = i;
txt1 = i.ToString();
}));
}
});
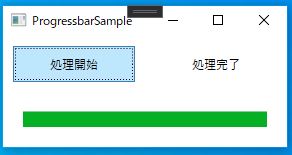
txt1 = "処理完了";
}
//ボタンのイベント
private void ProgressStart_Cmd()
{
//重い処理を実行
HeavyProgress();
}
//表示用テキスト
private string _txt1;
public string txt1
{
get { return _txt1; }
set
{
_txt1 = value;
NotifyPropertyChanged("txt1");
}
}
//処理の進捗率
private int _progressRate;
public int progressRate
{
get { return _progressRate; }
set
{
_progressRate = value;
NotifyPropertyChanged("progressRate");
}
}
public event PropertyChangedEventHandler PropertyChanged;
private void NotifyPropertyChanged(String info)
{
if (PropertyChanged != null)
{
PropertyChanged(this, new PropertyChangedEventArgs(info));
}
}
}
これでProgressBarを動かすことができました。
UI関連でグラフ表示の方法も書いてますのでよければ読んでみてください。


コメント