
C#(WPF)で画像表示する2つの方法を紹介します。
1つ目はシンプルに画像表示する方法で、2つ目はボタンを押したら画像が表示される方法です。
掲載しているサンプルコードはMVVM形式になっていますが他の形式でも役立つと思います。
2つの画像表示方法の違い
方法①:Viewで完結する方法
コード量が少なくシンプルな方法です。
単純に画像を表示するだけ(画像を切り替えたりせず、埋め込むだけ)ならこちらがオススメです。
方法②:データバインドを用いる方法
1つ目と比べて応用が利く方法です。
操作・状況に応じて画像の切り替えなどをしたい場合はこちらがオススメです。
画像ファイルをプロジェクトに取り込ませる方法と注意点
順序は以下の通り。
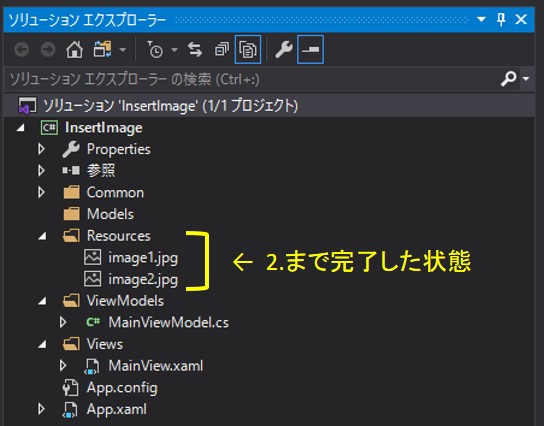
- VisualStudioのソリューションエクスプローラーにてResourceフォルダを作成
- 作成したResourceフォルダに表示したい画像ファイルをドラッグ&ドロップ(今回のサンプルでは2つの画像ファイルをドロップしています)
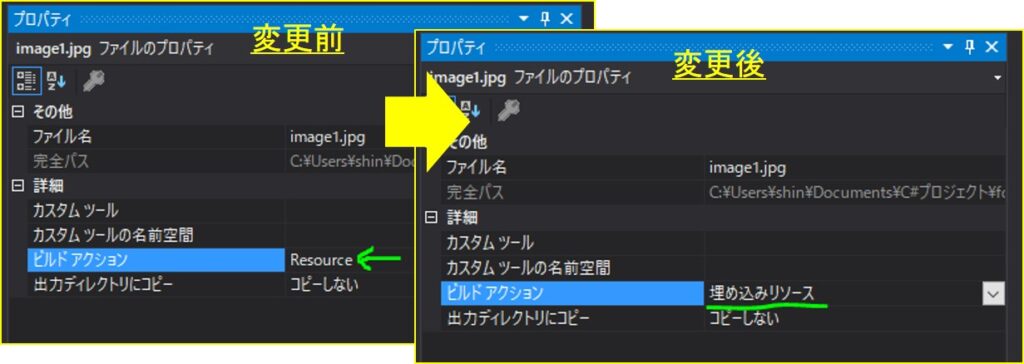
- 画像ファイルをクリックし、VisualStudioのプロパティタブにて「ビルドアクション」をResourceから埋め込みリソースに変更
ポイントは3です。この設定をしないとエラーになります。
ちなみに画像をドラッグ&ドロップするフォルダはなくてもできますが、フォルダを用意しそこに画像ファイルを入れることをオススメします。理由はそのほうが管理がしやすいからです。
サンプルコード
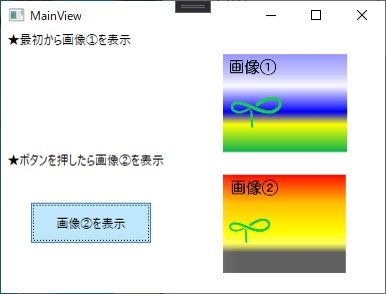
作成したソフトの動作
起動直後は以下のようになります。方法①で画像が一つ表示されています。
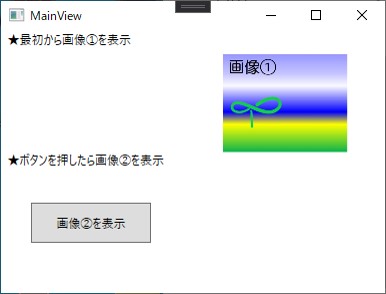
ボタンを押すと、方法②によりもう一つ画像が表示されます。
コード
2つの方法を一つのコードに書いています。
方法①で画像①を、方法②で画像②を表示しています。特にポイントとなる行には色を付けています。
今回の記事の本質ではない部分は省略しています(usingディレクティブやコマンドを使うためのファイルなど)。
View(XAML)は以下の通り。レイアウトは<Grid/>を使用しています。
<Window x:Class="InsertImage.Views.MainView"
        xmlns="http://schemas.microsoft.com/winfx/2006/xaml/presentation"
        xmlns:x="http://schemas.microsoft.com/winfx/2006/xaml"
        Title="MainView" Height="300" Width="400">
    <Grid>
        <Grid.RowDefinitions>
            <RowDefinition Height="20" />
            <RowDefinition Height="*" />
            <RowDefinition Height="20" />
            <RowDefinition Height="*" />
            <RowDefinition Height="20" />
        </Grid.RowDefinitions>
        <Grid.ColumnDefinitions>
            <ColumnDefinition Width="180" />
            <ColumnDefinition Width="*" />
        </Grid.ColumnDefinitions>

        <!--画像①表示(最初から表示)-->
        <TextBlock Grid.Row="0" Grid.Column="0" Text="  ★最初から画像①を表示"/>
        <Image Grid.Row="1" Grid.Column="2" Name="Image_1" />

        <!--画像②表示(ボタンを押したら表示)-->
        <TextBlock Grid.Row="2" Grid.Column="0" Text="  ★ボタンを押したら画像②を表示"/>
        <Button Grid.Row="3" Grid.Column="0" Margin="30" Content="画像②を表示" Command="{Binding InsertImage2Btn_Pushed}" />
        <Image Grid.Row="3" Grid.Column="2" Source="{Binding EmbededImage}" />
    </Grid>
</Window>
View(コードビハインド)は以下の通り。
方法①に関するコードがメインです。
namespace InsertImage.Views
{
    public partial class MainView : Window
    {
        public MainView()
        {
            InitializeComponent();

            MainViewModel vm = new MainViewModel();
            this.DataContext = vm;

            //画像①を挿入する
            InsertImage1();
        }

        //画像①を挿入する関数
        private void InsertImage1()
        {
            //画像①のパスを変数に
            string path1 = "InsertImage.Resources.image1.jpg";

            BitmapImage bmpImg = new BitmapImage();
            bmpImg.BeginInit();

            Assembly assembly = Assembly.GetExecutingAssembly();
            Stream stream = assembly.GetManifestResourceStream(path1);
            bmpImg.StreamSource = stream;
            bmpImg.EndInit();

            //View(XAML)に代入
            Image_1.Source = bmpImg;
        }
    }
}
ViewModelは以下の通り。
方法②に関するコードです。ボタンのコマンド設定とそれに呼ばれる画像表示関数があります。
namespace InsertImage.ViewModels
{
    public class MainViewModel:INotifyPropertyChanged
    {

        //コマンド
        public ICommand InsertImage2Btn_Pushed { get; set; }

        //画像②の変数(Viewとバインドする)
        private BitmapImage _EmbededImage;
        public BitmapImage EmbededImage
        {
            get { return _EmbededImage; }
            set
            {
                _EmbededImage = value;
                NotifyPropertyChanged("EmbededImage");
            }
        }

        public MainViewModel()
        {
            //コマンド
            InsertImage2Btn_Pushed = new RelayCommand(InsertImage2_Cmd);
        }


        //画像②を挿入する関数(ボタンが押されると呼ばれる)
        private void InsertImage2_Cmd()
        {
            //画像②のパスを変数に
            string path2 = "InsertImage.Resources.image2.jpg";

            BitmapImage bmpImg = new BitmapImage();
            bmpImg.BeginInit();

            Assembly assembly = Assembly.GetExecutingAssembly();
            Stream stream = assembly.GetManifestResourceStream(path2);
            bmpImg.StreamSource = stream;

            bmpImg.EndInit();

            //「Viewにバインドしている変数」に画像②を代入
            EmbededImage = bmpImg;
        }


        public event PropertyChangedEventHandler PropertyChanged;
        private void NotifyPropertyChanged(String info)
        {
            if (PropertyChanged != null)
            {
                PropertyChanged(this, new PropertyChangedEventArgs(info));
            }
        }

    }
}
上でも書きましたがとりあえず画像を表示したければ方法①で十分です。
コードビハインドにあれこれ書きたくない人、画像の表示/非表示を切り替えたり、画像編集をする場合は方法②がよいでしょう。
GUI周りはできると楽しいのでここら辺の学習は捗りがち(プログラミングあるある)。

コメント